20th March 2026
Insulation boards by Celotex can be installed in pitched roofs, flat roofs and solid masonry walls to name a few options. The good news is that installing these boards is a straightforward process once you have all the information to hand.
With this in mind, at INSULATION SUPERSTORE, we’ve created a comprehensive guide on everything you need to know so that you can successfully complete your project. So, whether you want to know how to cut Celotex insulation boards or learn how to fit them for a specific installation and much more, we’ve got you covered.
Table of contents:
- What is Celotex?
- How to fit Celotex insulation into masonry partial fill cavity walls
- How to fit Celotex insulation into timber frame wall lining
- How to fit Celotex insulation into timber frame wall sheathing
- How to fit Celotex insulation into all lining and dormer cheeks
- How to upgrade cavity walls with Celotex insulation
- How to upgrade internal lining systems using mechanical fixings
- How to fit Celotex insulation into solid walls
- How to upgrade solid walls with the dot and dab method
- How to upgrade internal solid wall systems with mechanical fixings
What is Celotex?
Celotex is a form of insulation typically installed within external walls. They can be applied internally as well depending on the type of insulation. The type of walls (also known as leafs) Celotex insulation can be installed into can be tricky to comprehend. This guide can make sure you’re all set for suitable insulation whatever the weather!
Not sure about what the best Celotex insulation is for your needs? Check out our Celotex comparison chart.
How to cut insulation board
First, make sure you have the correct protective gear on hand – clothing and goggles or safety glasses. When cutting the board, dust and particles can be produced, so it’s important protective assets are worn to ensure that you do not inhale the debris.
The most efficient way to cut Celotex is with a hand saw. Not only does this support minimal dust creation, but in many cases, you can use off-cuts to fill any gaps that may still be there during installation.
How to fit Celotex insulation into masonry partial fill cavity walls
Masonry partial-fill cavity walls are a popular type of external wall construction. They have been used for over a century. So here is what you will need to do when it comes to installing Celotex insulation boards in masonry partial fill cavity walls.
Insulation Superstore Top Tip: Make sure wall ties used are suitable for structural requirements and have a retaining clip to hold the insulation permanently in place – we recommend BBA-approved ones. Although the manufacturer’s advice may vary, butterfly ties are not considered suitable for partial-fill cavity projects by Celotex.
What you need:
- Celotex insulation boards: Celotex CW4000, PL4000
- Wall ties (BBA approved – not butterfly)
- Retaining clips (BBA approved)
- Mechanical fixings
- Insulation saw
Note: You will need to install the PIR cavity board between two types of masonry. As a standard measurement, a 50mm residual cavity is a must to maintain between the outer face of cavity insulation and the inner face of the outer leaf.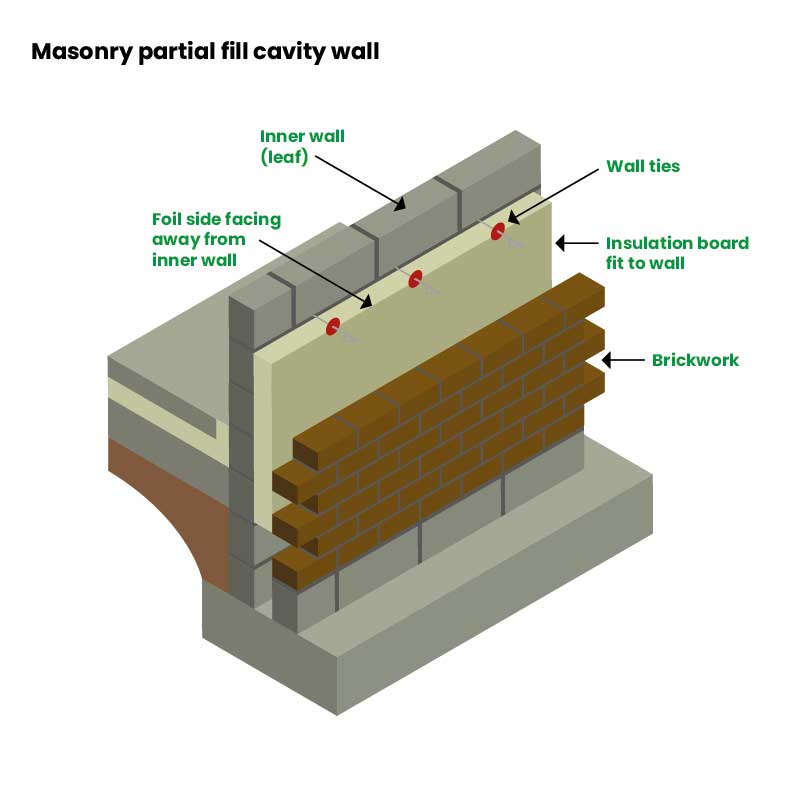
Fitting the Celotex insulation
Step one: Installing first row of wall ties
Install the first row of board-retaining wall ties at least one course below the damp proof course, positioning them at a maximum of 600mm centres horizontally. This will provide minimum support of two ties per 1200mm board.
Step two: Installing subsequent rows of wall ties
Install the second and following rows of ties at 450mm centres vertically with a maximum of 900mm horizontally. If structural purpose affects this, you may need to install ties at closer centres.
Step three: Placing and securing boards
Place the boards between the wall ties, securing each one with a retaining clip on each tie – ensuring both full and cut boards are retained by no fewer than three ties around their perimeters. Make sure horizontal and vertical joints are tightly butted to minimise heat loss. For internal and external angles, ensure the thickness of the board continues around the angle – continuing to make sure suitable wall ties are used.
Note: For windows and doors or other openings in the property, use proprietary insulated cavity closers.
Step four: Securing boards below the DPC level
For cavities closed at or below the DPC level by a methane barrier membrane, use mechanical fixings to secure the board to the brickwork above the DPC.
Note: Avoid puncturing the gas barrier membrane
If you want to upgrade the walls using PL4000, see here.
Always consider manufacturer or professional installation advice.
How to fit Celotex Insulation into a timber frame wall lining
Insulation Superstore Top Tip: For high thermal performance, place the unprinted foil face surface towards the air cavity.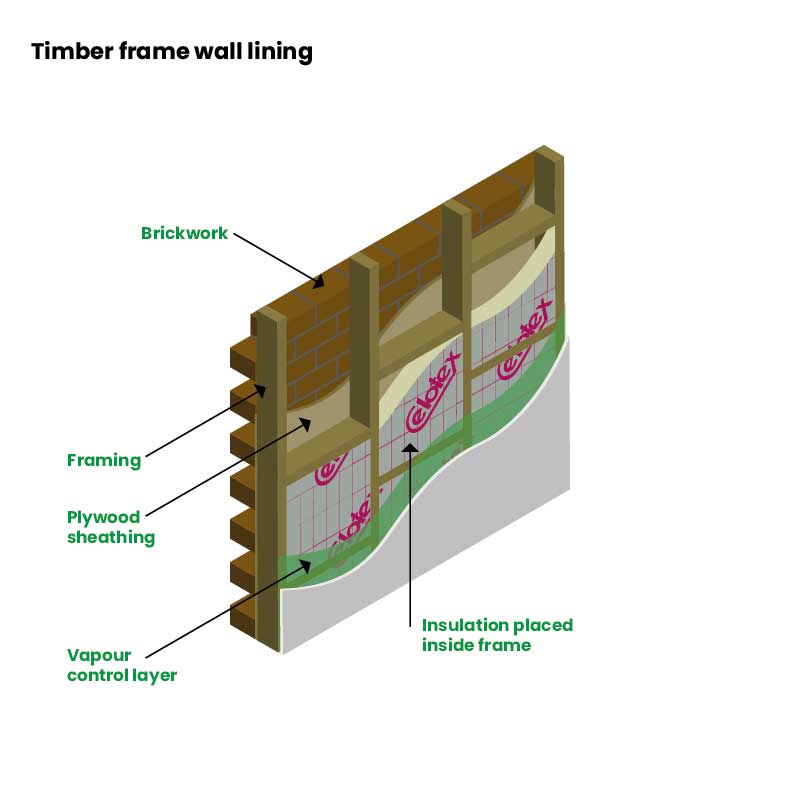
What you need:
- Celotex insulation board: Celotex GA4000, Celotex XR4000, Celotex TB4000.
- Board cutting tool
- Plasterboard lining
- Plasterboard nails/screws
Fitting the Celotex insulation
Step one: Ensuring flush installation of studs and rails
Make sure all services are installed and that all studs and rails are flush with no projections.
Step two: Inserting insulation and fitting services
Insert the insulation into the framing, pushing back the plywood sheathing. If necessary, fit services into the cavity and cut the boards to fit firmly between the stud rails. Ensure the wall insulation continues with the floor perimeter
Step three: Cutting and fitting infill panels
Cut leftover boards for infill panels and use cut-offs when possible to make sure there aren’t any gaps in the wall structure.
Step four: Installing vapour control layer
Install a vapour control layer over the warm side of the stud work
Step five: Fixing plasterboard lining
Fix the plasterboard lining over the vapour control layer using suitable plasterboard nails or screws.
Always consider manufacturer or professional installation advice.
How to fit Celotex insulation into timber frame wall sheathing
What you need:
- Celotex insulation board: Celotex GA4000, Celotex XR4000, Celotex TB4000.
- Galvanised clout nails
- Studs
- Sole plates
- Headrails
- Stainless steel wall ties
Fitting the Celotex insulation
Step one: Fixing Celotex sheet to external sheathing
Fix the Celotex sheet to external sheathing using galvanised clout nails – 400mm centres in the centre of the board and 300mm centres around the parameter. Face unprinted foil surface towards the air cavity for optimum thermal performance. Ensure to carefully align fixings with underlying studs, sole plates and headrails.
Step two: Tight alignment of boards
Tightly align boards together using off-cuts to fill in around waist rails.
Step three: Installing helical stainless steel wall ties
Use helical stainless steel wall ties to tie back brickwork to timber framing – drive through Celotex insulation into studs. Inserting ties approx. 10mm to 20mm above the brick course so a slight ‘crank’ can be applied, ensuring the tie slopes downward from the sheathing to the outer brickwork.
Always consider manufacturer or professional installation advice.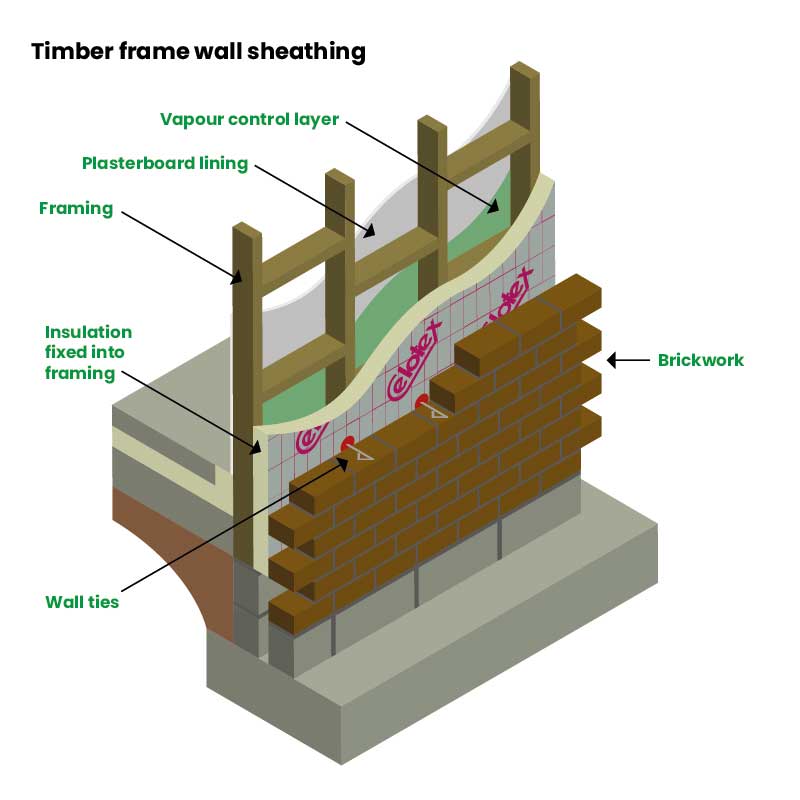
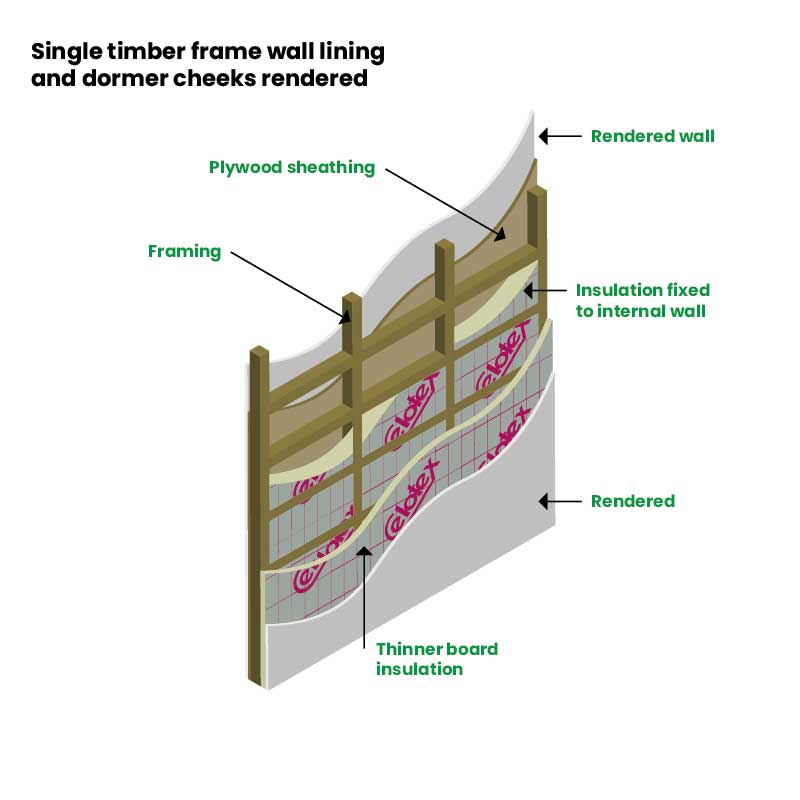
How to install Celotex insulation for single timber frame wall lining and dormer cheeks
What you need
- Celotex insulation boards: Celotex GA4000, Celotex XR4000, Celotex TB4000.
- Board cutting tool
- Insulation tape
- Jointing material
- Sealant
Fitting the Celotex insulation
Step one: Ensuring flush studs and rails
Make sure studs and rails are flush – no projections. Services must be correctly installed.
Step two: Installing Celotex insulation
Install Celotex insulation tightly between studs, pushing it up to plywood sheathing. For improved thermal performance, place the unprinted foil surface face against the air cavity within the stud work.
Step three: Cutting and fitting infill panels
Cut leftover boards for infill panels; use cut-offs where possible and make sure there are no air gaps in the wall abutment.
Step four: Installing PL4000 board insulation
Install the PL4000 board insulation over the studs, ensuring the edges of the boards are packed close together and not leaving any gaps.
Step five: Fixing boards and creating a vapour control layer
Fix back the boards at the stud lines as well as the top and bottom rails. Ensure joints between the boards are tightly aligned, taped and jointed with the correct tape and jointing material – this will create a vapour control layer.
Step six: Vapour sealing perimeter abutments
Use a sealant to vapour seal all perimeter abutments; make sure to seal around all penetrations for electrical outlets and switch boxes.
Always consider manufacturer or professional installation advice.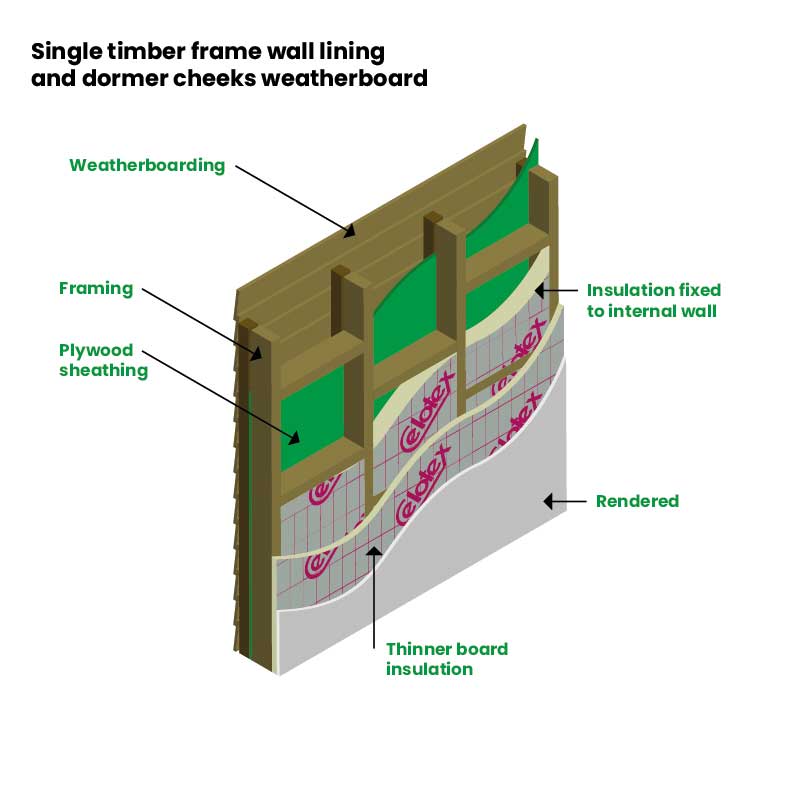
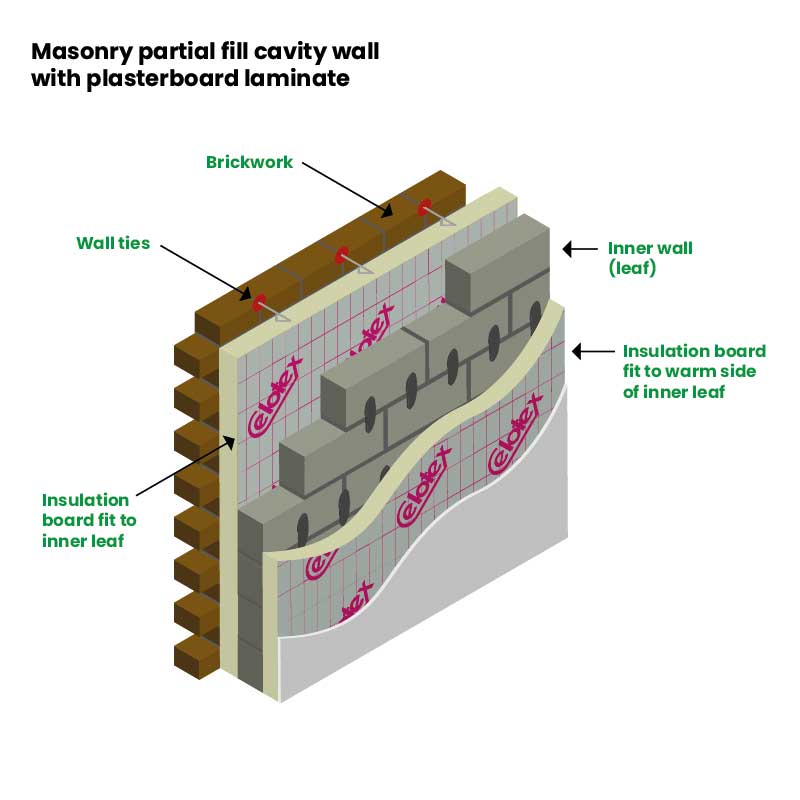
How to upgrade cavity walls with Celotex insulation
A brief overview of cavity walls can be seen here.
Due to increased care being taken regarding insulation standards, today it’s important to ensure the target U-value set for properties is met with proper insulation.
Insulated plasterboard that adheres to the masonry inner leaf or can be mechanically fixed to timber battens is the way to go when it comes to upgrading the insulation of cavity walls. Celotex PIR foam boars are fantastic for this as they are easy to handle and have a minimum thickness. Not only reducing lost floor space but also keeping high thermal efficiency.
Note: If you’re a homeowner who wants to improve the performance of the property, replacing or adding more insulation in an already-treated cavity is not possible.
If you plan to upgrade the wall as a whole, you can add building fabric, airtightness and controlled ventilation for improved thermal performance. Place composite facing on the insulation board, behind the plasterboard layer, to form a type of air and vapour control layer -tape and join the tapered edges to do so.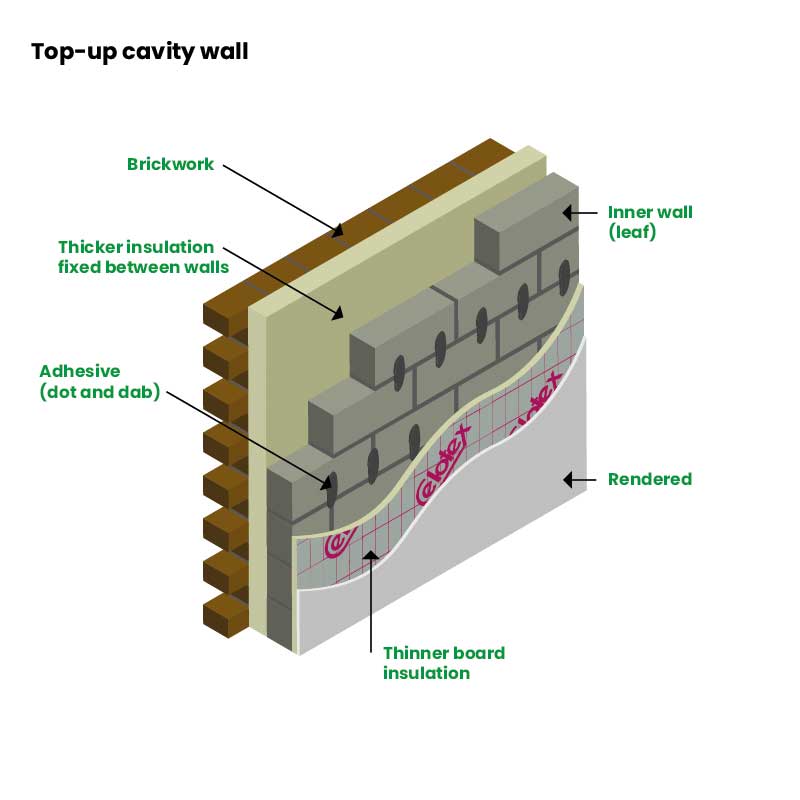
What you need:
- Celotex insulation board: PL4000
- Adhesive
- Fixings
- Timber battens
- Insulation tape
Fitting Celotex insulation
Step one: Surface preparation
Make sure existing walls are permeable – strip away any existing gloss paint or vinyl for a clear space.
Step two: Applying adhesive and battens
Apply a continuous band of adhesive to ensure a continuous seal is at the skirting, ceiling level and openings. Thin timber battens can replace adhesive at perimeter edges. Add additional adhesive where necessary, according to manufacturer instructions,
Step three: Aligning insulation
Align the insulation against the adhesive to secure it into the right position.
Step four: Applying secondary fixings
Once the adhesive has been set, apply secondary fixings to Celotex PL4000 – ensure fixing details are in line with fixing manufacturer recommendations.
Step five: Creating a vapour control layer
Ensure the joints between the boards are tightly aligned, taped and jointed with the correct tape and joint material – this will create a vapour control layer.
Note: Avoid the load being directly applied to the Celotex PL4000. Mechanical fixings should be used for other internal fittings. Seek advice regarding suitable fixings from the manufacturer.
Always consider manufacturer or professional installation advice.
How to fit internal lining systems using mechanical fixings
What you need
- Celotex insulation board: Celotex PL4000, Celotex GA4000, Celotex TB4000
- Mechanical fixings
- Insulation tape
- Timber battens
Fitting the insulation
Step one: Surface preparation
Make sure existing walls are permeable and stripped of any gloss paint or vinyl wallpaper for a clean surface.
Step two: Cutting PL4000 board
Cut the 1200mm x 24000 PL4000 board to fit the board floor-to-ceiling height of the room. When using softwood timber battens, make sure they are treated before installation.
Step three: Fixing timber battens
Fix treated timber battens to the masonry, set out at a maximum of 600mm vertical centres – this will coincide with the edges of the boards. Horizontal battens, as a minimum requirement, are to be used as a support at the top and bottom of the board edges.
Step four: Securing Celotex PL4000
Secure Celotex PL4000 with appropriate mechanical fixings – details must be aligned with instructions from the fixing manufacturer.
Step five: Creating a vapour control layer
Create the vapour control layer by tightly aligning, taping and jointing the joints between the boards with suitable tape.
Always consider manufacturer or professional installation advice.

How to fit Celotex insulation into solid walls
The solid wall has a similar installation method to the upgrading cavity walls, with a few minor tweaks, such as the type of board that can be used. Therefore, if you’re hoping to improve the performance of your solid wall then adding more insulation to the outer face of the wall is not always a possibility.
When it comes to the insulation, however, some solid masonry walls can be found narrower than 200mm. In this case, the timber stud work might need to be fixed away from the wall by 50mm instead of directly to the wall.
What you need
- Celotex insulation boards: Celotex TB4000, Celotex GA4000, PL4000.
- Timber battens
- Insulation tape
- Sealant
Fitting the insulation – GA4000
- Make sure walls are in good condition and suitable for internal linings – take care to remove any vinyl wallpaper or gloss pain to leave the wall surface clean, dust-free and free from loose material(s). Ensure the wall is also dry, having any remedial work done before the installation of the boards to remove dampness.
- Where required, cut the assigned 1200mm x 2400mm board (Celotex PL4000 or Celotex GA4000) to ensure they fit floor-to-ceiling room height.
- Place unprinted foil surface facing batten cavity for optimum thermal performance.
- At the top and bottom of the wall, fix horizontal battens over the insulation to keep the insulation boards in place. Seal each board joint.
- Create a vapour control layer using insulation tape
- Place further vertical battens over the insulation at the appropriate spacing -this will provide suitable fixings for the desired lining system. Make sure a batten meets with each lining board joint. Note: For window and door reveals, use Celotex TB4000 boards -this reduces the risk of thermal bridging. Install the batten around the edge of the opening and scribe the board to fit the reveal. Cut the dry lining to suit and mechanically fix it into the masonry reveal – use proprietary fixings.
- Use an angle fillet at the frame and an angle bead or scrim tape at the external corners to finish.
- Apply appropriate sealant around the perimeter of the insulation – this will provide a vapour seal.
- Use further battens -minimum 50mm x 25mm treated softwood- around all openings to provide fixings for linings, grounds for skirting etc. If cables are located within the cavity created by the batten, increase the batten depth to ensure tubing is taken into account.
Note: For heavy wall-mounted parts, use independent horizontal battens. You may also need longer fixings to fit heavy items to the masonry, separate from the battens.
Always consider manufacturer or professional installation advice.
How to upgrade solid walls with the dot and dab method
Note: Make sure existing walls are in suitable condition and can take internal linings. Any vinyl wallpaper and gloss paint should be removed, with debris (dust etc) to also be removed to leave a clean surface.
What you need:
- Celotex insulation: Celotex PL4000
- Adhesive
- Timber battens
- Insulation tape
Fitting the insulation – PL4000
Step one: Preparing walls
Apply a continuous band of adhesive to ensure a continuous seal is at the skirting, ceiling level and openings. Thin timber battens can replace adhesive at perimeter edges.
Step two: Cutting insulation boards
Next, add additional adhesive where necessary, according to manufacturer instructions, then align the insulation against it to secure it into the right position.
Step three: Positioning insulation
Once the adhesive has set, it is advised that secondary fixings are applied to Celotex PL4000 – ensure fixing details are in line with fixing manufacturer recommendations.
Step four: Fixing horizontal battens
Ensure the joints between the boards are tightly aligned, taped and jointed with the correct tape and joint material – this will create a vapour control layer.
Always consider manufacturer or professional installation advice.
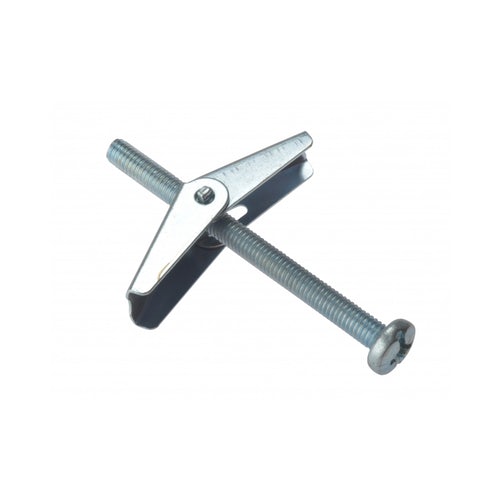
How to upgrade internal solid wall systems with mechanical fixings
Use suitable mechanical fixings to secure Celotex PL4000 insulation – fixing details should be dealt with as advised by the manufacturer’s fixing instructions.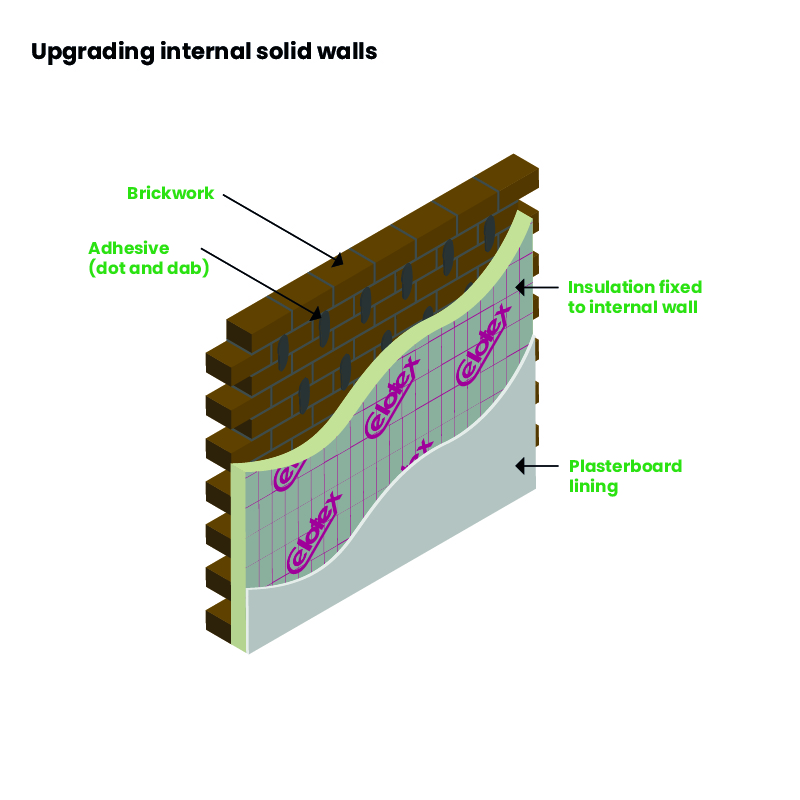
What you need
- Celotex insulation boards: Celotex TB4000, Celotex GA4000, Celotex PL4000.
- Insulation tape
- Angle fillet
- Angle bead
- Scrim tape
Fitting the insulation
Step one: Fitting Celotex insulation
Fit the Celotex insulation tightly using suitable mechanical fixings (in accordance with the manufacturer’s instructions).
Step two: Creating a vapour control layer
Create the vapour control layer by tightly aligning, taping and jointing the joints between the boards with suitable tape.
Step three: Installing Celotex PL4000 for window and door reveals
For window and door reveals, use Celotex PL4000 boards -this reduces the risk of thermal bridging. Install the batten around the edge of the opening and scribe the board to fit the reveal. Cut the dry lining to suit and mechanically fix it into the masonry reveal – use proprietary fixings.
Step four: Finishing touches
Use an angle fillet at the frame, as well as an angle bead or scrim tape at the external corners to finish.
Always consider manufacturer or professional installation advice.
Final thoughts
Although the specific steps for installing Celotex insulation boards might differ slightly depending on the application, the overall process is generally the same. Moreover, following the standard procedure ensures consistent results.
In a nutshell:
Installing Celotex insulation boards involves carefully fitting them into place using appropriate mechanical fixings, ensuring a snug and secure fit. The boards should be installed tightly to minimise gaps and maximise thermal efficiency.
Creating a vapour control layer by sealing joints with suitable tape helps enhance the insulation’s effectiveness. For specific areas like window and door reveals, using Celotex PL4000 boards can help reduce thermal bridging. Moreover, proper installation techniques, such as installing battens and securing dry lining, are crucial for achieving optimal results. In addition, careful attention to these details ensures maximum energy efficiency and long-term performance.
Finally, attention to detail in finishing touches, such as using angle fillets and tape at corners, ensures a professional and effective insulation installation.

Was this guide useful?
Mentioned in this project guide: