Loft ladders and hatches offer convenient access to elevated storage areas, such as attics or lofts, helping you make the most of your home space.
With a suitable loft ladder and door, you’ll be able to safely retrieve or store items, perform maintenance tasks and inspect the property’s infrastructure, enhancing functionality and organisation while promoting safety by providing secure means of ascent and descent.
To help you choose the right loft door and ladder for your home, at INSULATION SUPERSTORE, we decided to put together the ultimate buyer’s guide to help you understand which loft ladders and hatches you might need.
Table of contents:
- What is a loft ladder?
- What is a loft hatch?
- Insulating a loft hatch
- Widening a loft hatch
- Choosing the right loft ladder and hatch
- Final thoughts
What is a loft ladder?
A loft ladder is used as a point of access to a loft. In the past, they were clunky, large and not very supportive. Today’s technology has allowed us to improve upon the design and now we can have loft ladders that are not only reliable but safe to use.
You can also have ladders that are compact to save space and replace the need for separate mechanisms (i.e. a ladder on its own). In fact, there are many different types of loft ladders, including; folding, sliding, telescopic, concertina and more.
If you would like to know how to fit a loft ladder, we have a Help & Advice guide for that.
What is a loft hatch?
Traditionally, loft access might not have even been attached to the ceiling. In fact, it might have been as simple as a piece of flat wood laying over the top of the space that you would have to push up and lift off every time you entered. That’s too much of a hassle and one solution that wouldn’t help if you were in a rush to get ready for the holidays!
Nowadays, loft hatches are designed with a variety of features and adhere to the latest safety standards to make access and safety that much more efficient. They also come in a variety of sizes to suit most homes.
You can now have mechanisms in place to improve your experience when you access the loft. Choose from loft doors with selected U-values, fire protection, drop-in or hinged opening types and much more.
How to insulate a loft hatch
Insulating a loft hatch can be a somewhat challenging task, requiring accurate measurements and careful fitting of insulation material to ensure effective coverage.
While the process itself is not overly complex, attention to detail is crucial to prevent gaps and maintain proper sealing, which may require some DIY skills and patience to achieve optimal results.
The good news is we have an step-by-step guide on how to insulate your loft hatch door.
How to fit architrave around a loft hatch
If you are fitting architrave around a loft hatch, you will need four planks of wood. Typically, these will have 45° mitres at both ends of all four pieces. This will ensure they can be fit together as smoothly as possible at 90° angles.
As with a door architrave, you need to place the architrave around the loft hatch.
How to widen a loft hatch
Depending on the type of loft ladder you wish to fit, your loft hatch opening may need expanding.
Before doing so, make sure where you plan to widen the latch space doesn’t affect the main supporting beams or timber lintels. Cutting through main systems can mean they can protrude into the loft space if not careful. If cutting the space is a risk or you’re unsure, contact a professional.
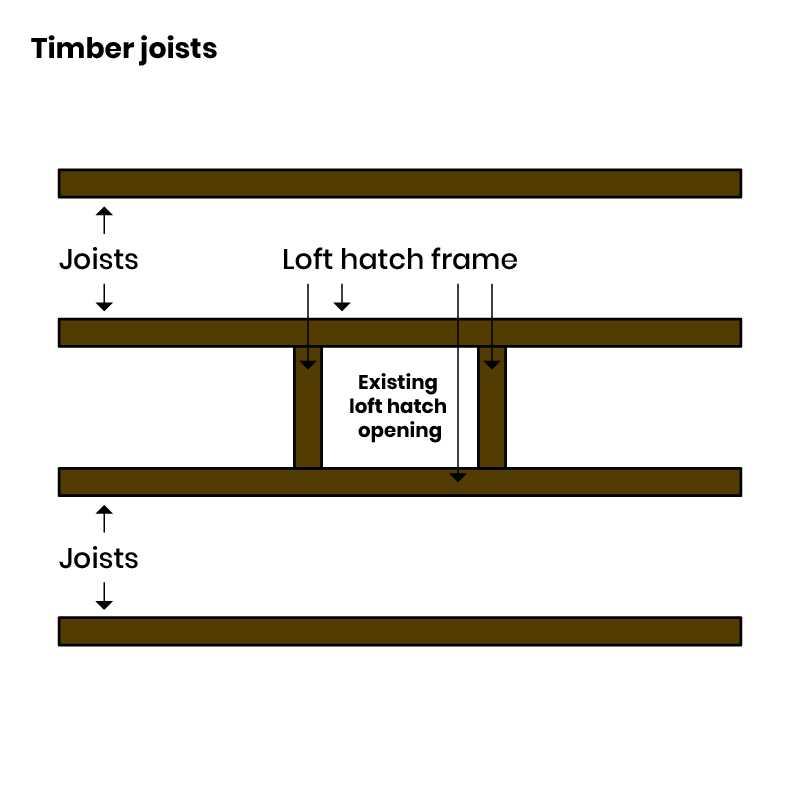 This (above) is the standard setup when it comes to a loft hatch system.
Note: for those installing a hatch, check with the manufacturer or an expert before enlarging.
Before enlarging the hatch, you will need to confirm the area is clear for adjustment. Using a detector, run it across the area you’re looking to cut. You will need to ensure there are no studs, pipes or wires. Doing this will also allow you to find where the ceiling joists are. Mark the edge of these joists on the ceiling as this will dictate where the access space can be placed.
Once preparation is complete, time to follow these simple steps:
Step 1: Measurements
For the new opening, you will need to measure and mark what size you want your new opening to be. Add four inches to both sides, on top of the four existing ceiling joists. This is done to allow space to add two timbers to either side of the new opening, which will need to be the same size as the current joists.
For example, if joists are two inches, we need two on either side – this is the reason for the four inches. If the result is wider, increase the gap you leave as necessary.
Note: If your new hatch goes past two joists, contact a professional to check the structural integrity is not lost when it comes to cutting more than two joists.
Step 2: Supports
Behind the lines you have marked, place a four-inch x one-inch timber flat in the joists. Screw the timber down, using two-and-a-half-inch screws across the timber. This will be your supporting system that can be removed after the finishing step.
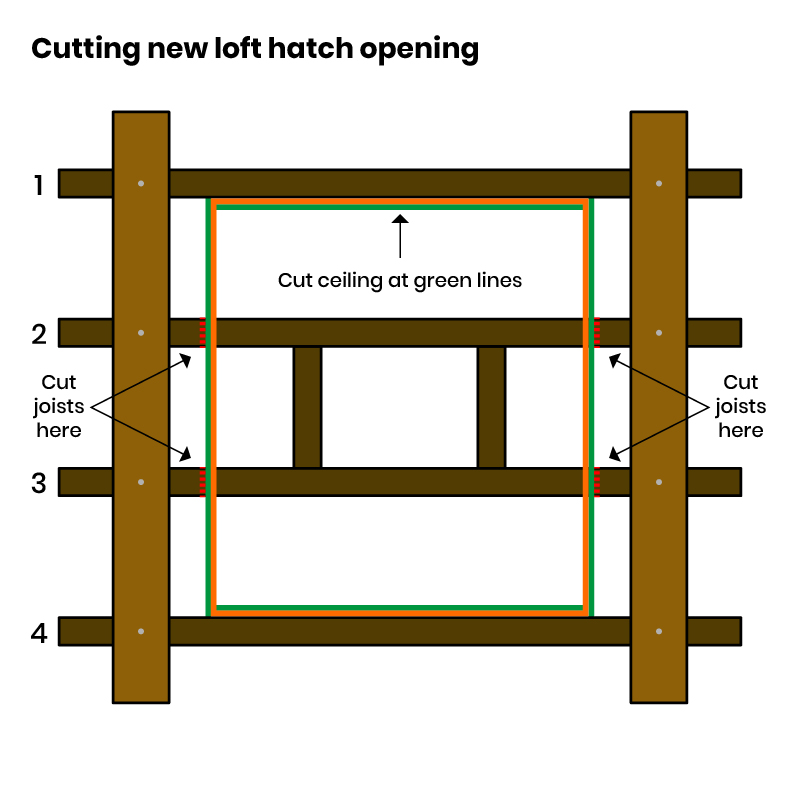
Step 3: Creating the wider opening
If you have already checked for cables and pipes with a detector, you can begin the cutting process. Cut the ceiling along the green lines, then cut through joists 2 and 3 only where marked – leaving the first and fourth beams intact. This will be your wider opening.
 Step 4: Using timber to form the new opening
End timbers are used to form the new opening and, as seen in the provided image below, will need to match the width and depth of the current joists. You will need to drill pilot holes into the first of each of the end timbers on the sides of the opening.
These will then need to be screwed to the ends of the cut joists. Once the first timber is fixed, fix the second to the front of the first. Nail the second timber onto the first on each side of the opening – three-inch wire nails are preferred.
When those are in place, screw the second timber through the sides – top and bottom, replicating the process done to the first timber.
Step 5: Finishing stage
Remove the large supporting timbers on both sides of the hatch. Line the opening with four or five-by-one-inch planed timber where your new loft hatch is going to sit. Architrave can be used to cover the cut underside of the opening. There you have it! Your new, wider loft hatch.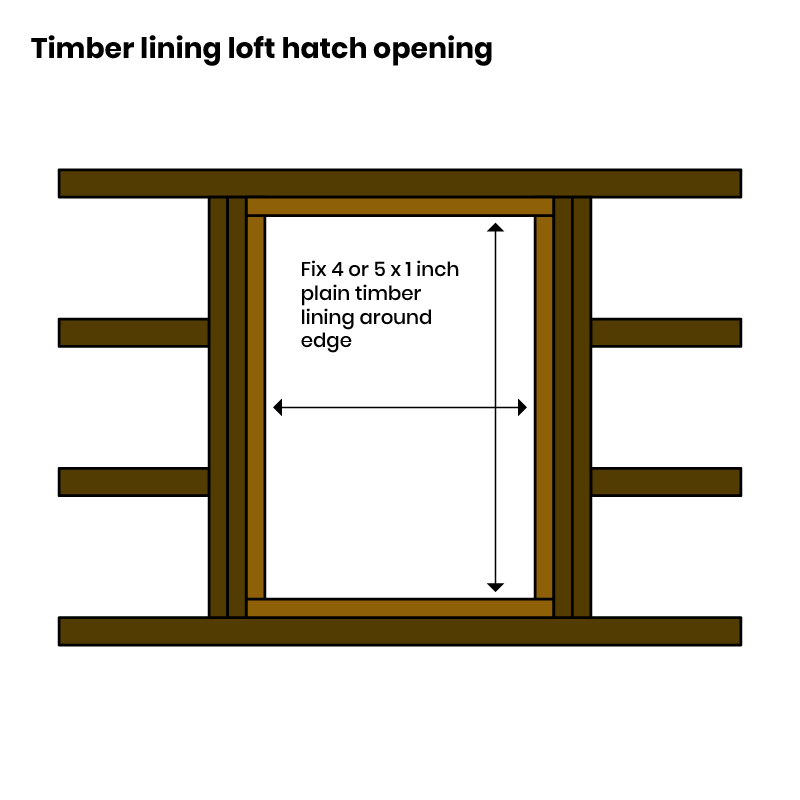
Choosing the right loft ladder and hatch
When selecting loft ladders and hatches, several factors should be considered to ensure suitability and functionality.
Firstly, assess the available space in your home and choose a ladder and hatch size that fits comfortably within the designated area while providing sufficient access to the loft. Look for sturdy construction and durable materials to guarantee safety and longevity, considering weight capacity and stability.
Secondly, opt for features such as non-slip treads and handrails for added safety during ascent and descent. Ensure the hatch provides a tight seal when closed to prevent heat loss and maintain energy efficiency.
Lastly, consider ease of installation and any additional features like insulation or integrated loft access solutions that may enhance convenience and functionality in your home.
Final thoughts
When it comes to loft ladders and hatches, you should now feel well-informed about their sizes, functionality, and how they can be altered. If your property has an attic, they make loft access easy and far less daunting. Modern loft ladders and hatches are compact and easy to use. So, if you already own either of them, it might be time to consider an upgrade. You can do so by checking out our range or giving us a call on 01752 692 206.